

Table of Contents
- Quick Comparison: Best Premium Dog Harnesses for Hiking
- Key Features to Look for in a Premium Dog Harness for Hiking
- How to Measure Dog for Harness: Step-by-Step
- Best Dog Harness for Hiking with Handle: Top Picks
- How to Stop Dog Pulling on Leash: Training Tips for Trail Safety
- Harness Maintenance and Cleaning for Long-Lasting Gear
- Conclusion
- Frequently Asked Questions
Last Updated: September 10, 2026
Quick Comparison: Best Premium Dog Harnesses for Hiking
A premium dog harness for hiking is a padded, adjustable vest-style harness that distributes load across a dog's chest and shoulders, with reinforced attachment points and reflective trim.
Below is the short version; the rest covers measuring your dog, what separates a trail-worthy harness from a sidewalk one, and how to fix pulling.
| Harness | Price | Attachment Points | Best For |
|---|---|---|---|
| No-Pull Dog Harness with 2 Leash Clips (Black, L) | $27.09 | Front + back | Most large breeds, all-around hiking |
| No-Pull Dog Harness - Front Clip, Heavy Duty (Red, L) | $36.48 | Front + back, metal | Strong pullers, technical terrain |
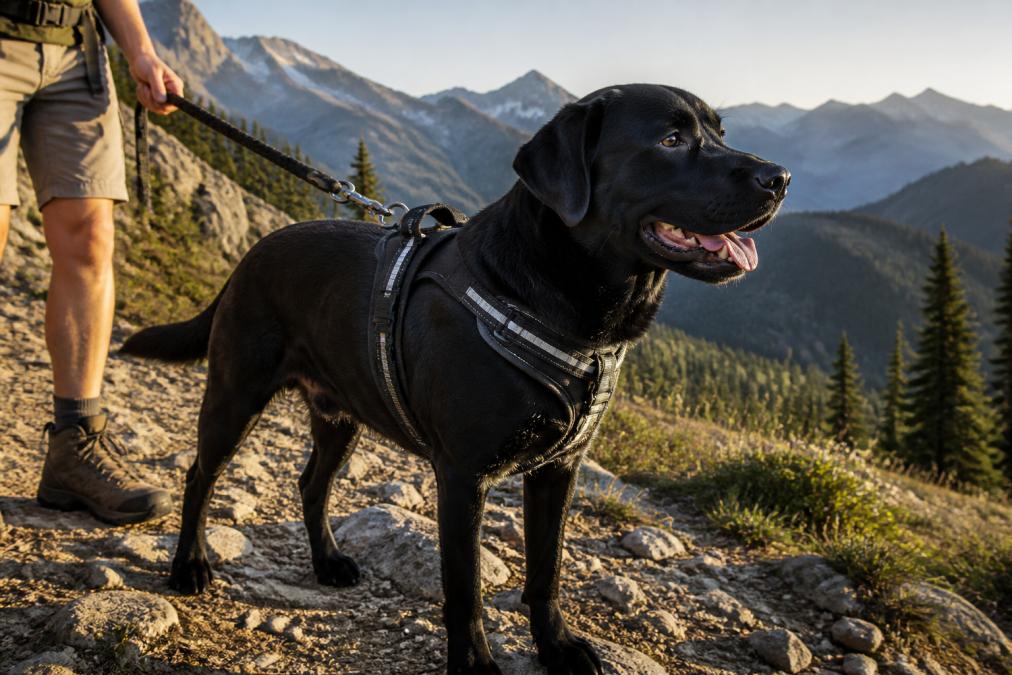
Quick Picks:

- Best Overall: No-Pull Dog Harness with 2 Leash Clips, dual clips, breathable mesh, and a control handle at $27.09
- Best for Strong Pullers: No-Pull Dog Harness - Front Clip, Heavy Duty, metal clips and no-rip nylon at $36.48
- Best Leash Pairing: Mighty Paw Retractable Leash 2.0, reflective nylon tape for dogs up to 50 lbs
Key Features to Look for in a Premium Dog Harness for Hiking
A trail harness earns its price in four places: the lifting handle, the reflective treatment, the belly strap, and the load path that carries force into the dog's skeletal frame rather than its throat.
Safety Features: Handle, Reflective Trim, Belly Strap
A padded control handle lets you steady your dog over rock scrambles or lift them over a fallen log. It should be anchored to structural webbing with bar-tack stitching at both ends, not stitched to a padded panel, a handle sewn only to foam will tear out the first time you lift a 70-pound dog.
Reflective trim matters more than most owners expect: on shaded forest trails, ambient light drops fast, and a high-visibility harness gives drivers, bikers, and other hikers earlier warning. Retroreflective trim bounces light back toward its source (best for headlamps and vehicle lights), while fluorescent fabric only glows under daylight (osha.gov). A trail harness benefits from both.
The belly strap stops the harness from sliding sideways when your dog lunges. On steep descents, a harness without one rotates around the ribcage and can pinch the shoulders. A properly fitted belly strap sits behind the ribcage, not across the widest part of the chest.
Durability and Material Quality
Look for durable nylon or Oxford fabric with reinforced stitching at every stress point. Abrasion resistance matters on granite and sandstone, where cheaper webbing frays within a season, and quick-release buckles should be metal on a heavy-duty harness, not plastic. A few specifics separate premium from mid-tier:
- Webbing denier: 1-inch nylon webbing rated around 4,000-6,000 lb tensile strength is common on premium harnesses; budget webbing stretches under load.
- Padding density: Closed-cell foam resists water absorption; open-cell foam soaks up sweat and trail moisture and gets heavy.
- Hardware: Aluminum or stainless-steel D-rings and side-release buckles resist corrosion and cold-weather cracking. Plastic buckles can become brittle below freezing (PubMed).
- Stitching pattern: Box-X stitching distributes load across four directions; single-line stitching concentrates stress on one seam.
Load Distribution and Range of Motion
A premium hiking harness spreads leash and lift force across the chest and shoulders instead of concentrating it at the neck. The Y-shaped front design is preferred over a straight horizontal chest strap because it keeps pressure off the trachea and lets the shoulders rotate freely.
Range of motion matters on technical terrain: a harness that restricts shoulder extension shortens your dog's stride and increases fatigue on long climbs. Test fit by having your dog walk, trot, and climb stairs, if the harness bunches at the shoulder or the chest strap rides into the throat, it's too tight or the wrong cut.
Breathability for Warm-Weather Hiking
Breathability is a summer-trail concern. Mesh panels over the chest and belly move heat and moisture away, but mesh abrades faster than solid webbing: a fully mesh harness runs cooler but wears out sooner on rocky terrain. For three-season hiking, mesh over the sternum with solid webbing at the load points is the usual compromise.
Ease of Putting On and Taking Off
A trail harness should go on in under 15 seconds with cold or gloved hands. Two side-release buckles are faster than a step-in design, which requires lifting a paw and is harder to adjust once on. Practice buckling before you leave the car.
How Harness Type Affects Fit: Front-Clip vs. Back-Clip
Front-clip harnesses redirect forward motion sideways, which helps with pulling, but the lateral load means the chest strap must be snug enough not to rotate. Back-clip harnesses allow freer movement but offer no pull control. A dual-clip harness gives you both, which is why it's the default recommendation for most hiking dogs.
How to Measure Dog for Harness: Step-by-Step
To measure a dog for a harness, take two measurements with a soft tape: girth (the widest part of the ribcage, just behind the front legs) and neck circumference. Keep the tape snug but not tight, and add roughly two fingers of slack.
- Measure girth behind the front legs, at the deepest part of the chest
- Measure neck circumference at the base of the neck
- Measure from the base of the neck to the base of the tail for vest length
- Re-measure after a bath or grooming session, since coat volume changes fit
- Check the manufacturer's size chart against your numbers, not your dog's breed label
A common mistake is sizing up "to grow into." A loose harness rubs, and a rubbing harness is the fastest way to make a nervous dog hate the trail (avma.org).
Best Dog Harness for Hiking with Handle: Top Picks
The best dog harness for hiking with handle combines a padded control grip, multi-point adjustment, and leash attachment points for both training and casual trail use. Our top two picks check those boxes.

No-Pull Dog Harness with 2 Leash Clips - Adjustable, Reflective, Padded Vest for Large Dogs (Black, L)
Our top pick for most hikers. At $27.09, it delivers a front clip that reduces pulling, a back clip for relaxed stretches, and four adjustment straps for a secure fit.
The padded chest plate and breathable mesh keep chafing down on long days, reflective strips matter on dawn or dusk hikes, and the control handle gives extra grip for steep descents or lifting your dog over obstacles.
Pros:
- Dual leash attachment points for training and casual hiking
- Four-point adjustment fits many large-breed body shapes
- Breathable mesh padding reduces chafing prevention issues on long trails
- Easy on/off with two buckles
Cons:
- Plastic buckles, not metal
- Best suited to large breeds; smaller dogs need a different size
No-Pull Dog Harness - Front Clip, Reflective, Heavy Duty with Handle for Large Dogs
If your dog is a committed puller or you hike technical terrain, this is the upgrade. At $36.48, the extra cost buys metal leash clips, no-rip nylon, and heavier padding.
The chest clip redirects forward motion, the core of any no-pull design. Reflective strips run along the body for low-light visibility, the heavy-duty handle is built for quick lifts over rock gardens, and four adjustment points keep the fit secure without restricting range of motion.
Pros:
- Metal clips and no-rip nylon hold up to strong pullers
- Heavy-duty handle for lifting and control
- Reflective strips for trail safety
- Four-point adjustment for a custom fit
Cons:
- Heavier than the dual-clip option
- Slightly higher price
Leash pairing: The Mighty Paw Retractable Leash 2.0 ($24.42) uses reflective nylon tape and a tangle-free swivel clip, ideal for dogs up to 50 lbs. For dogs up to 110 lbs, the 26ft Retractable Leash ($24.39) has a 360-degree tangle-free design and an anti-slip rubberized handle.
How to Stop Dog Pulling on Leash: Training Tips for Trail Safety
Stopping a dog from pulling comes down to three habits: reward the position you want, stop moving when the leash goes tight, and use a front-clip harness to make pulling less rewarding. On a trail, pulling isn't just a manners problem, it's a safety problem, and training has to account for terrain the sidewalk never tests.
The Core Training Loop
- Reward your dog for walking beside you, not just for sitting
- Stop walking the instant the leash tightens, then resume when it slackens
- Change direction when your dog surges ahead, so pulling never gets them where they want to go
- Practice on quiet trails before crowded ones
- Keep sessions short and end on a win
The front-clip design on both harnesses above redirects forward motion, making pulling less effective without choking or pinching. Pair that with the stop-and-resume habit and most dogs improve within a few weeks.
Why Trail Pulling Is Different from Sidewalk Pulling
On a sidewalk, a pull costs you a little arm strain. On a trail, it can put your dog over an edge, into a rattlesnake, or into the path of a downhill mountain biker. Three trail-specific risks change how you should train:
- Switchbacks and exposure: A dog that pulls on a narrow switchback can drag you off-balance near a drop-off. Teach a default "wait" at the inside of every turn before you need it.
- Wildlife encounters: A pull toward a deer, a porcupine, or a bear is a different problem than a pull toward a squirrel. A reliable recall and a solid "leave it" matter more on trail than perfect loose-leash walking.
- Other trail users: Horses, bikers, and off-leash dogs appear without warning. A dog that can hold position while another user passes is safer than one that only walks politely on an empty path.
Using the Harness Handle for Emergency Control
The padded handle on a hiking harness isn't just for lifting over logs, it's your emergency brake. If your dog lunges toward a hazard, grabbing the handle gives immediate, full-body control without yanking the leash and risking a neck injury. Practice reaching for it on calm walks so the motion is automatic when you need it.
Emergency Carries and Extraction on Difficult Terrain
This is the scenario most harness guides skip: what happens when your dog can't walk out. A sprained paw, cut pad, heat exhaustion, or sudden injury on a remote trail means you may have to carry or assist your dog for miles.
A harness with a structural handle and reinforced load points lets you:
- Lift a dog over a rock obstacle by the handle while supporting the chest with your other arm
- Assist a limping dog by holding the handle at hip height, taking weight off the injured limb
- Improvise a sling by running a length of webbing or a spare leash through the handle and under the dog's chest, creating a supported carry for a larger dog
- Lower a dog down a steep section by keeping tension on the handle while a partner manages the leash
A harness without a handle, or with a handle sewn only to padding, cannot do any of these safely. This is the single strongest argument for a purpose-built hiking harness over a general-purpose walking harness.
Pairing the Harness with Other Trail Gear
A hiking harness is the anchor point for the rest of your dog's kit. Pairings worth planning for:
- Dog backpacks: A saddlebag-style pack attaches to the harness's back panel. Keep loaded weight under roughly 10-15% of your dog's body weight, and introduce the empty pack on short walks before a real hike.
- Cooling vests: A cooling vest goes under or over the harness depending on the cut. Check that the harness straps don't compress the cooling panels against the skin, which reduces airflow.
- GPS trackers: A tracker clipped to the back D-ring adds redundancy if your dog slips a collar. Test the clip on a short hike before trusting it on a remote one.
First-Aid Accessibility
Keep a small trail first-aid kit accessible to you, not buried in your dog's pack. Gauze, vet wrap, tweezers, and a spare carabiner for an improvised sling cover most dog injuries on a day hike, you want the kit in your hands within seconds, not unclipped from a saddlebag.
Harness Maintenance and Cleaning for Long-Lasting Gear
A hiking harness should be rinsed after every muddy or dusty hike and hand-washed with mild soap every few weeks. Trail grit works into webbing and padding, abrading both the fabric and your dog's coat.
- Rinse with cool water after muddy hikes
- Hand-wash with mild soap, never machine-wash
- Air-dry away from direct heat, which can warp padding
- Inspect stitching at the front clip and handle monthly
- Check buckles for cracks, especially after cold-weather hikes
Most harnesses last several seasons with this routine. The failure point is almost always the front clip stitching or a cracked buckle, so check those two spots before every big hike.
Conclusion
Finding a premium dog harness for hiking that holds up on technical terrain, fits securely, and helps with pulling is harder than it should be. Most harnesses are built for sidewalks, not switchbacks.
Our hiking harnesses are designed with features that matter on the trail: a padded control handle, four-point adjustment, reflective trim, and dual leash attachment points. Our No-Pull Dog Harness with 2 Leash Clips and our Heavy Duty Front Clip Harness are both designed for large, active dogs and the owners who hike with them.
Get started with Paw Fit Gears and gear up for your next trail day with a harness built for the terrain.
Frequently Asked Questions
What is the best harness for dogs for hiking?
The best harness for hiking depends on your dog's size and hiking style. For large breeds, a no-pull harness with a front clip and a sturdy handle works well. Look for breathable mesh, reflective trim, and adjustable straps. Paw Fit Gears offers two premium options: the No-Pull Dog Harness with 2 Leash Clips ($27.09) and the Heavy Duty No-Pull Dog Harness ($36.48). Both are designed for comfort and control on technical terrain.
Why is a handle important on a dog harness for hiking?
A handle on a dog harness gives you immediate control when navigating steep or technical terrain. You can lift your dog over obstacles, assist them up ledges, or steady them if they slip. It's also useful for restraining your dog quickly if another hiker or wildlife appears. The best dog harness for hiking with handle will have a reinforced handle that can support your dog's weight without digging into your hand.
How do I measure my dog for a harness?
To measure your dog for a harness, use a soft measuring tape. Measure the girth (the widest part of the ribcage, just behind the front legs) and the neck circumference. For Y-front harnesses, also measure from the base of the neck to the base of the tail. Compare these measurements to the harness sizing chart. A secure fit allows two fingers to slide under the straps but isn't loose enough to slip off.
Are front-clip or back-clip harnesses better for hiking?
For hiking, front-clip harnesses are generally better for dogs that pull because they redirect forward motion to the sides, giving you more control. Back-clip harnesses are better for dogs that don't pull and need full range of motion. Many premium hiking harnesses, like the No-Pull Dog Harness with 2 Leash Clips, offer both front and back attachment points so you can switch based on terrain and your dog's behavior.
How do I stop my dog from pulling on the leash during hikes?
To stop pulling, use a front-clip harness and reward your dog for staying near you. Start with short training sessions on flat ground, then gradually add distractions. When your dog pulls, stop walking until the leash slackens. Consistent practice with a no-pull harness like the Heavy Duty No-Pull Dog Harness ($36.48) can reduce pulling.